Have you ever come around a leeward mark only to find that the genoa halyard is not tight enough? To make matters worse, you now have to grind it up under tremendous load. This can be largely avoided by having accurate settings marks for the halyard. Hoist the halyard to the mark, and you’re done—no questions asked. The same is true for almost every other adjustable line or car on your boat. Markings immediately tell you exactly where everything must be. Your trimming will be more consistent from tack to tack, plus, you’ll save time studying the sails, allowing you to get your head out of the boat much sooner.
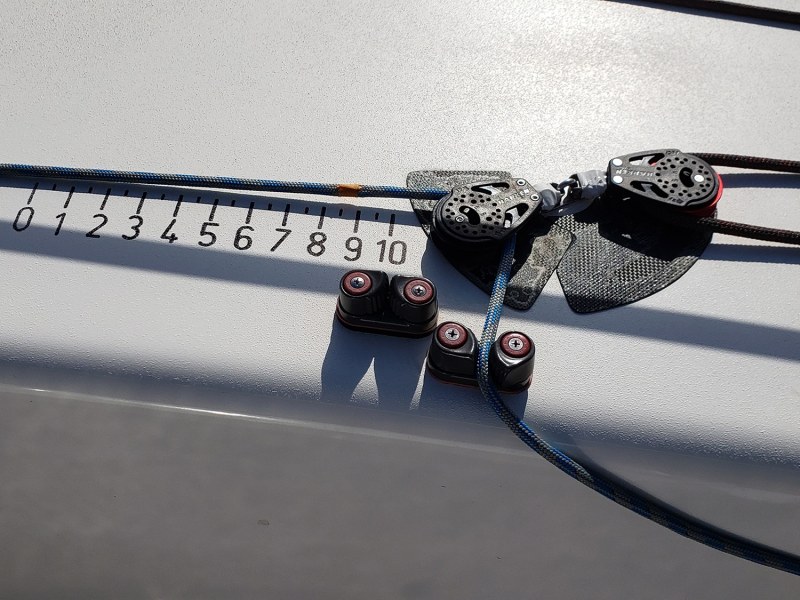
A common and accurate way to mark jib or genoa halyards so that the tension can be easily replicated is to place a scale on the deck with a marker or decal and then mark the halyard. I use a 12-inch scale on deck, marked every inch. I set it up so that when the jib or genoa is raised and tensioned hand-tight, the mark on the halyard is even with the No. 2 mark on the scale. This allows for a slightly looser halyard in light air and much tighter halyard in breeze, while still being on the scale. At a weather mark, the pit person notes what number the halyard is at and then, at the leeward mark when the jib or genoa goes back up, the pit person can pull the halyard to the same mark.
RELATED: Headsail Furling Tips
For spinnaker halyards and tack lines I simply pull the halyard or sheet as hard as I can and mark the maximum up or out locations. When using a clutch, I generally mark the rope in front of the clutch so it is never hidden in the clutch. When using a cam cleat, I mark the rope just behind the cleat.
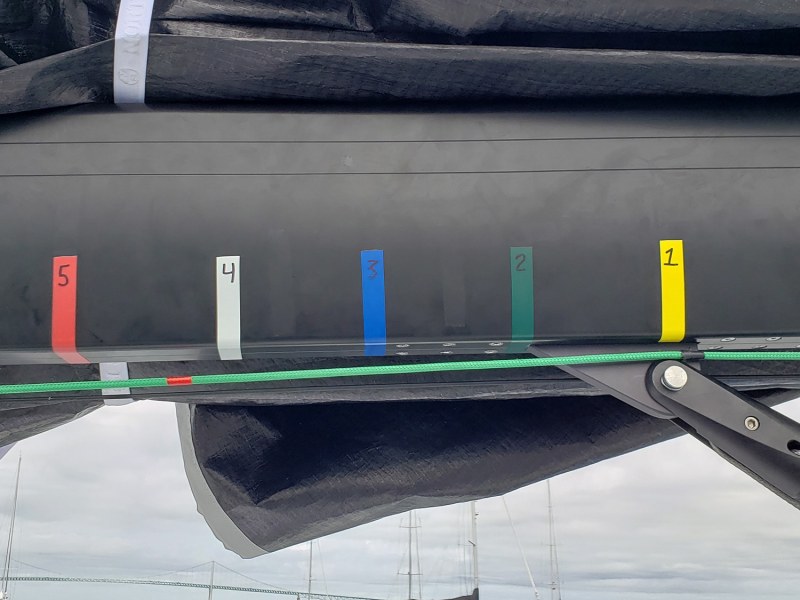
There are many ways to mark jib and genoa leads, and you need to find what works best for your boat. If you’re sailing a one-design, there’s likely a common way your competitors mark their tracks. Using the most commonly accepted system helps you better when settings with friends or competitors. On the J/70, for example, we mark the deck even with the aft end of the car and then number the marks based on the preferred tuning guide. That way, the marks are highly visible and the car position is easy to reproduce. Some boats mark the deck even with the pin on the car. On boats with purchase systems rather than pin-stop cars, we number the entire track with marks spaced 3 to 6 inches apart, depending on the size of the boat.
Mark Your Sheets
On small boats, we mark the spinnaker sheets so they can be cleated at the spot on the rope so that, when the spinnaker fills, it’s not over trimmed. It really helps the trimmer know where the clew needs to be before the spinnaker actually fills. It’s also helpful in light air on boats where the spinnaker trimmer may be busy during the set: just pull to the mark, then deal with the other details.
Jib sheets are often marked one of two ways. One way is to mark the sheet at the edge of the winch drum when maximum trimmed. Or, like the jib halyard, you can whip the sheet and use a scale on deck. If you have this setup, you will likely need a slightly longer scale than you used for the halyard. If your boat has in-haulers, mark them so that you are symmetric.
Marking the mainsheet provides an important reference point. If you’re going fast, note where it is. Later, if you’re not as fast, note where the mark is relative to where it was before. If it’s different, maybe it’s time to return to the original position. A mainsheet mark also helps at the leeward mark. The main can be easily trimmed back to where you had it on the previous weather leg without having to study the sail shape to hard.
Control-line Marks
On our J/70, we have three colored whipping marks for the outhaul noting light, medium and heavy settings. We also use colored whippings or colored tape marks on our vang. However, we use more whippings to cover a larger range of settings, since there is a much larger difference between tight and loose in the vang. Whether you are vang-sheeting upwind or controlling twist when planning, the vang must be set accurately.
For boats with symmetric spinnakers and longer poles that require dip-pole jibes, mark the topping lift at its standard height when sailing in all-purpose conditions as well as where it must be to allow the pole to swing through the foretriangle without hitting the lifeline or forestay. Also, mark the mast so the mast man knows where to put the butt end of the spinnaker pole. If your bow person is always complaining when you pull the afterguys out of their hand before they can “make” the guy in the pole, then mark the guy at the winch when it’s loose so you know they have enough slack to make the pole.
For boats with runners, marking helps maintain consistent tension between tacks and also helps the runner trimmer find quick, accurate tension after each tack. Putting marks on the traveler also helps repeatability from tack to tack.
Making marks is easy and you certainly do not need expensive graphics. You can get away with colored thread, colored electrical tape, a stencil kit and black markers. If using markers, go with the “Industrial” or Sharpie’s “Extreme Fade Resistant” markers.