Congratulations, you’ve made it to the top of the beat. Now it’s time to nail the first weather-mark rounding, which, when done well, will set you up for a good position on the run. For simplicity, let’s look at three useful weather-mark moves: the starboard-tack approach, the port-tack approach and the 80 percent approach.
Starboard-Tack Approach
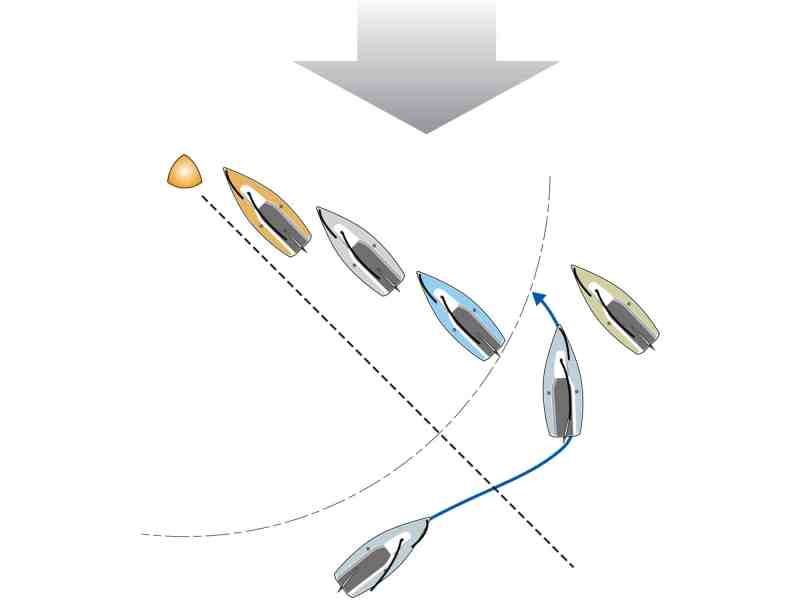
We are doing well in the day’s first race, on starboard tack, and comfortably laying the windward mark. We are slightly overstood and threatened by a lineup of port-tackers coming in just below the three-length zone. They will be looking to tack to starboard, inside and to leeward of us. Our concern is that, if they do tack, they might gain mark room on us and control our positioning going into the offset. To defend our position, we want all port-tackers to dip our stern rather than tack to leeward of us.
When you see this situation developing, the move is to bear off sharply and aim well to leeward of the windward mark until you get right on (or slightly below) the layline. Then aim for the mark. Done well, the port-tackers have some difficult escape options: 1) forcing their tack below the layline and attempting to pinch to the mark, which risks them hitting it; 2) taking our stern, and probably several other sterns as well; and 3) worst of all, being forced to tack or jibe before laying the mark. We all know how that plays out, and it’s not pretty.
Don’t give the port-tacker room to pass in front of you on port tack, or they might do so. Bear off just enough that you can still make the mark when you head up again, yet without giving the port-tacker the room they need to complete a tack and still lay the windward mark. In other words, you will make it but they will not.
For you, there are two risks. First, if you bear off too much, you might end up not laying the mark, so you must know exactly where the layline is and be ready to pinch and use your momentum to get around the mark. (Don’t forget about the current strength and direction, if it’s a factor.) Second, because you are a right-of-way boat and altering course, you must do so early enough and far enough away from the port-tack boat to allow them an escape. Otherwise, you violate RRS 16, “Changing Course.”
Port-Tack Approach
It’s the next race, and now the shoe’s on the other foot. The first rule of a port-tack approach is to get onto starboard before the three-length zone. Therefore, we always aim to be tacking onto starboard at least four boatlengths from the windward mark or farther to ensure our tack is completed outside the three-length zone. Nothing good happens to a port-tacker tacking inside the zone.
As we approach the zone on port tack, we are looking at the starboard parade from a long way out. We need to know where and how we are going to fit into the lineup of starboard-tackers. They’re probably playing follow the leader, most of them slow and sailing in bad air. We have several options. First, if we find a gap larger than a boatlength, we can probably tack into it and not risk fouling the boat ahead or astern. We need to complete our tack in accordance with RRS 13, “While Tacking.” We might have to foot a bit to find the right gap, which could be well worth it compared to lining up in the starboard-tack parade of bad air. Here, speed is our friend.
Second, it might be possible to cross clear ahead of a starboard-tack boat and then tack to windward of them. This works well if you have a clear cross but not enough room to tack to leeward or ahead. Sure, you will probably round the windward mark and the offset mark behind that starboard-tack boat, but you will likely be ahead of everyone else. This is one of those moves I’m surprised not to see more frequently.
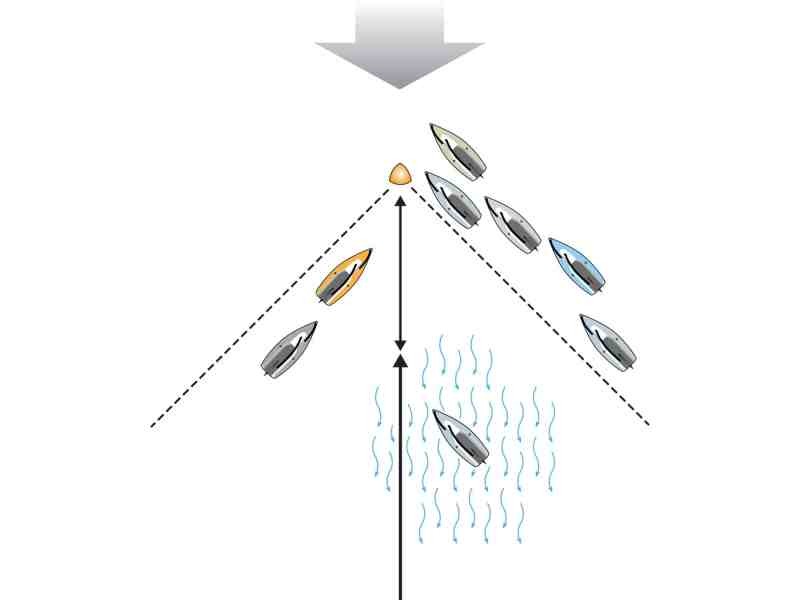
Our third option is the aggressive port-tack approach. Let’s refer to the diagram: We are on port tack, attempting to slot in between two starboard-tackers, S3 and S4. If we make our duck too late, we will be unable to complete a J-hook turn or tack without fouling S4. But if we bear away early, anticipating the necessary tack to starboard, we can pass astern of S3 and already be above closehauled on port. In other words, we do the turn early, approaching low, and start the turn as soon as possible after clearing S3’s transom. The advantage of this is we have much less of a turn to make to complete the tack and can more easily slot into the narrow gap between S3 and S4. With the port-tack approach, speed and momentum are our friends once again. It’s tough to get clear air near the windward mark, which is why the port-tack approach can be so effective. Plan the maneuver early and maximize speed while minimizing the final part of the turn from high port onto starboard, with sails filled as quickly as possible and without fouling S4.
The 80 Percent Approach
We’re in the third race, and things aren’t going as well. This time, we’ve had a bad start, the upwind slows, or perhaps we had a penalty turn or went to the wrong side of the course. For whatever reason, we’re mid fleet at best, and there’s a ton of bad air on both the starboard- and port-tack laylines. Now’s the time for the 80 percent approach. This means that for the first 80 percent of the beat, we stay away from the port and starboard laylines. By waiting until the final 20 percent of the beat to get to a layline, we should be able to enjoy relatively clean air to leeward of the starboard and port parades, and reach our goal of rounding midfleet. One measure of a top team is to always advance in the fleet. We think of advancing (or declining) throughout the race as the “delta factor.” We always strive for a positive delta and to pass more boats than any other team.
As we sail on port or starboard beneath the layline parades, we carefully watch for our perfect opportunity to tack and advance closer to or onto the layline in clean air. Our choices of when to tack also consider windshifts, wind gusts, traffic and perhaps current. But the 80 percent approach allows us to chip away at several of the nearby mid fleet boats, round the windward mark in a respectable position, and maintain a positive delta factor.
Offset Mark Exits
Once around the windward mark, we have a short reach to the offset mark in many keelboat classes. There are five basic exits from that mark, so the key is to have a simple, effective way to communicate to our crew which playbook maneuver we’ll be using. We use a simple code:
Hot Set The goal is to be higher than all boats ahead and behind, and immediately shift into the passing lane. To perform the Hot Set, plan ahead with the crew, be sure the vang has been eased, get the halyard up, guy or tack line on quickly, sheet in and hike. The Hot Set is a difficult maneuver that requires careful and skilled boathandling to avoid broaching, especially in heavy winds. It’s ideal for passing slow boats in front, particularly boats having trouble with poor sets. Do be careful, though, because those boats can be particularly dangerous if they luff you with the jib (only) still up.
Normal Set The goal here is to follow the boat in front of us. We don’t try to gain a leeward or windward advantage, just follow. The Normal Set is a go-to exit from the offset mark when you at least want to maintain the status quo. It puts you in position to gain, and you should never lose. Use it to maintain your position in the race and prepare for the next positive delta gain. The tactician must carefully inform the helmsperson if an overlap does occur with the boat ahead, and whether it should be on the windward or leeward side.
Low Set The objective is to gain depth on the fleet ahead or behind, and to stay on the starboard jibe. With the Low Set, the helmsperson steers to leeward of the boat(s) ahead. We quickly square the pole or, on an asymmetric spinnaker boat, max out easing the sheet. Windward heel helps. The Low Set is best when there is a gap of clean air behind so we don’t get blanketed.
Set/Jibe Our intent is to set the spinnaker and then immediately get onto port jibe with smooth speed, maintaining our turn and ideally keeping the spinnaker full through the maneuver. On a boat such as an Etchells, a tip is to set the spinnaker pole on starboard because it helps rotate the spinnaker around the headstay for the jibe.
Jibe/Set The goal is to immediately jibe to port and then set the spinnaker. With both the Set/Jibe and the Jibe/Set, be careful of jibing to port ahead of port- and starboard-tack parades. They can seriously blanket all boats jibing within 100 to 300 meters of the windward and offset marks.