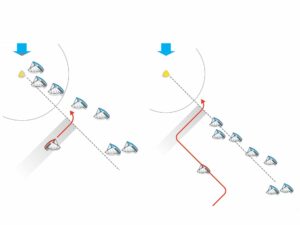
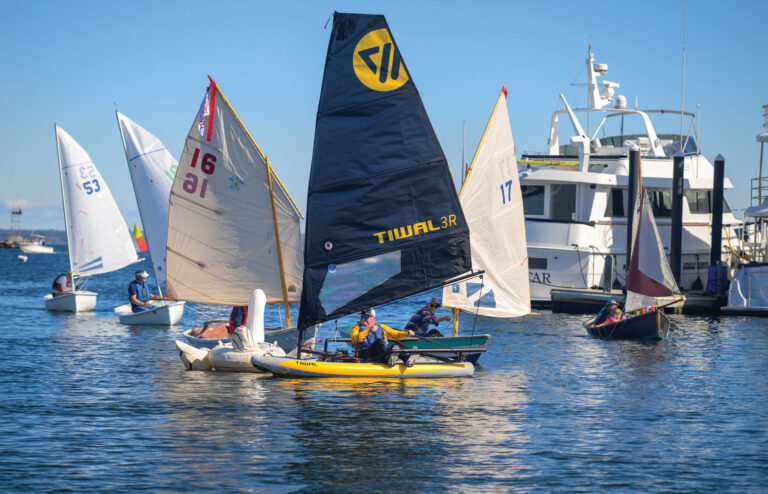
There are a number of ways to approach the windward mark, and each has its own chess-like moves that can make or break the rounding. One of my favorites is when two boats are on port, one to windward of the other, approaching the weather mark (outside the mark zone in this example) and both must tack onto starboard to round the mark to port. There are three ways it can play out, so let’s look at each.
Scenario 1: Leeward boat (Red) plays the winning move by shutting the windward boat (Blue) out.
With a well-timed tack just barely on, or slightly shy of the layline, Red can force the windward boat (Blue) to tack shy of the layline, shutting out Blue from the mark. This can end badly for Blue, who has to either slow down and unhook to tack behind, or jibe around. Either way, they lose significant distance, and worse, they are now well in the zone on port. This is not a good look if there is a wall of starboard tackers coming.
But it’s not so easy for Red either. To make it stick, first, they have to tack in just the right spot— shy of the layline and close enough to just make it. This is not without some risk. If they tack too shy, they won’t make it either, and there will be two boats trying to tack or jibe onto port in the zone. We know how messy that can get.
Rules matter here, too, so as soon as Red starts their tack (passes head to wind), Rule 13 says they are the give-way boat until they complete their tack (are on their closehauled starboard course.) Rule 10 (port-starboard) says they now have the right-of-way. But Blue need not anticipate or take any action until the tack is complete. And even then, Red is not completely in the right yet. Rule 15 says that once they acquire right-of-way, they need to give Blue room to keep clear. In short, Red needs to get onto a starboard closehauled course with enough time for Blue to get out of the way.
Correctly played, Red’s powerful offensive move effectively shuts the door on Blue.
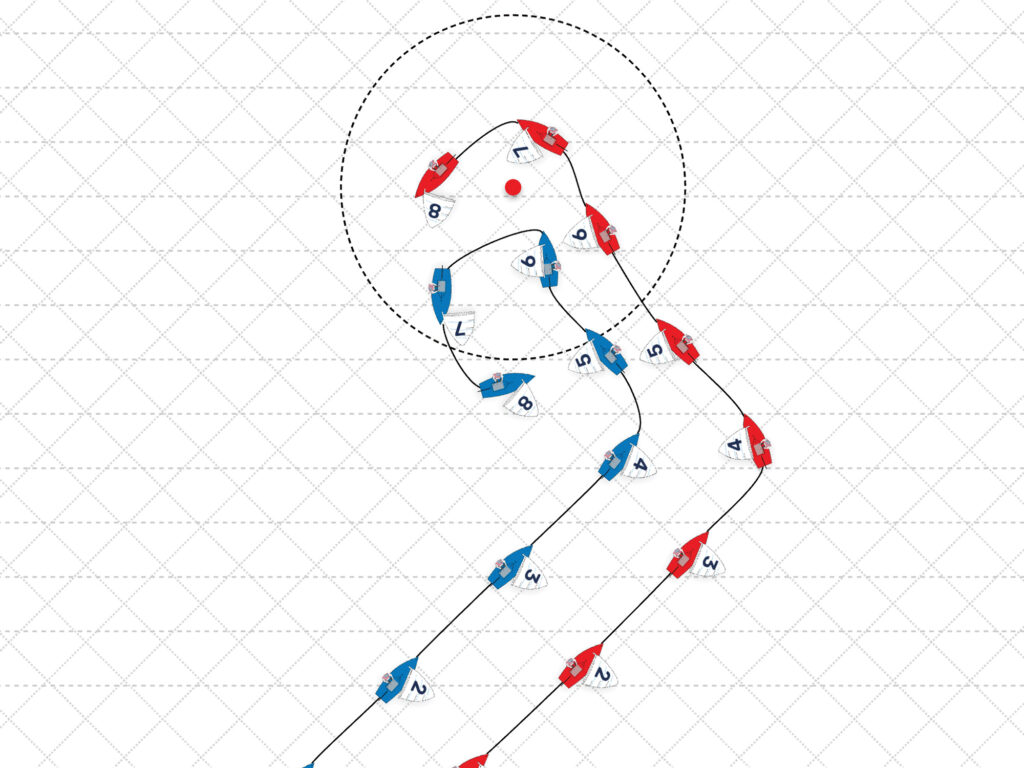
Scenario 2: Leeward Boat (Red) Delays Tack or Overstands, Allowing Blue Inside Overlap
Red may not be savvy to the above shut-out move and sail too far, or they may know the move and just misjudge and leave room for Blue to tack in there. I won’t spend much time on this because either way, Red just plain blew it. As long as Blue can tack to leeward without breaking the rules, and they can lay the mark, they should be able to round. Red has no choice but to keep clear as a windward boat and because Blue has mark room. Blue wins that chess exchange.
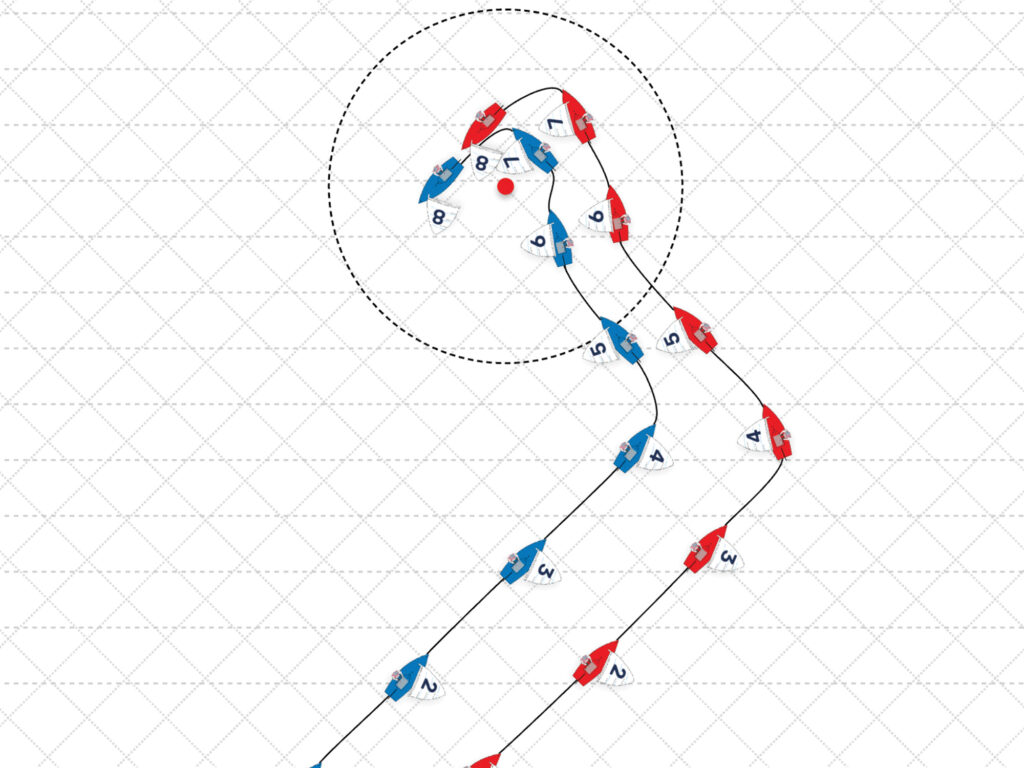
Scenario 3: Windward Boat Executes the Shutout
The third scenario is my favorite; it’s the “shutout” move where Blue takes full control of its destiny well before the layline, and well before either boat tacks. Blue needs to be thinking a few moves ahead and recognizes that Red, if they tack in that perfect tight layline spot, could shut them out (as in Scenario 1).
The shutout begins with Blue aggressively bearing off to a position still to windward, but much closer to Red, preventing Red from completing its tack without fouling. By the time Red would start its tack, Blue would already be in a position where Red could not finish the tack while providing room to keep clear (Rules 13 and 15).
An important practical consideration during this maneuver is communication. Since Blue’s move might catch Red by surprise (as Red is likely focused on the starboard layline, approaching boats, or the mark itself), it’s smart—though not required by the rules—for Blue to hail, “Don’t tack too close!” with enough time for Red to see and digest the situation. This hail alerts Red to Blue’s presence and intention. Red should realize they have no viable option but to wait for Blue to tack, then tack and follow them around the mark.
The bear-away is the key to success; it has to be done right. Blue needs to do it soon enough to leave time to communicate, and close enough to be effective, but not so early and close that they risk slowing considerably in Red’s backwind.
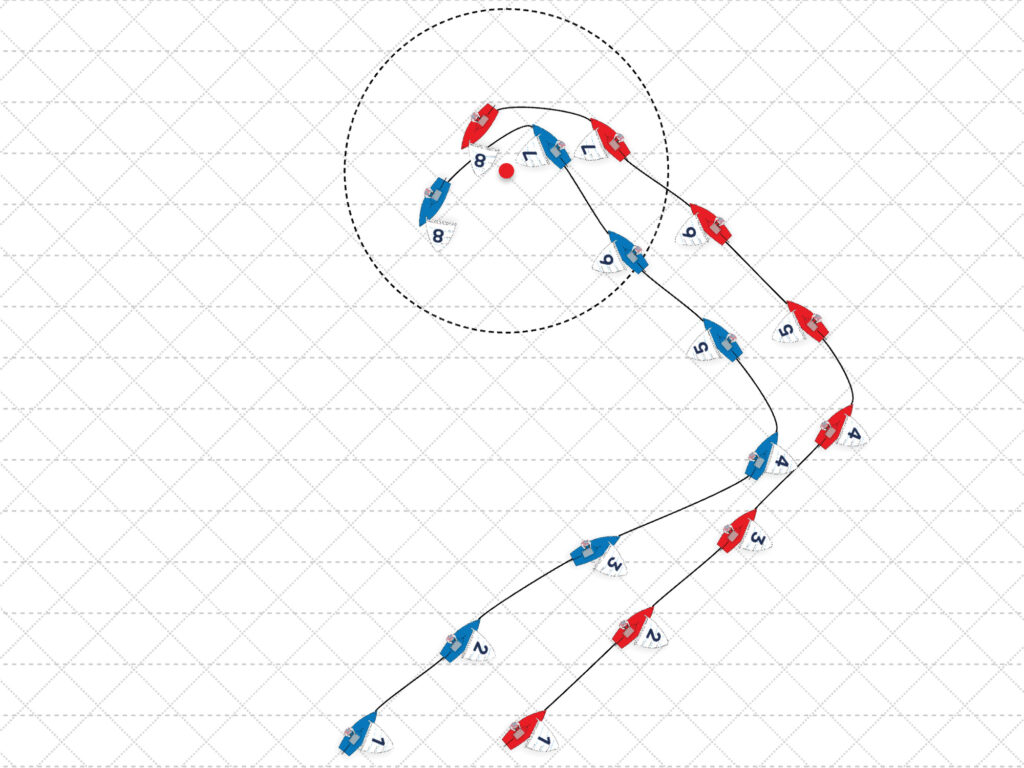
Now let’s add the next layer of complexity: we’re in the zone. If Blue tacks outside the zone, as in our example, they have mark room and can aggressively use that (short of tacking) to get around the mark. But when Blue tacks in the zone, Rule 18.3 puts significant limitations on their actions. Even though they don’t have mark room, they are leeward boat (Rule 11) and Red can’t bear off on them to prevent them from going in there. But Rule 18.3, puts significant limitations on Blue’s actions, they can’t head Red up above closehauled. In a subtle update for the 2025-2028 rules that came out this year, this applies whether or not the original leeward boat, Red, tacked before or in the zone. In short, if Blue tacks outside the zone, Blue can do just about anything it wants to (short of tacking) to get around the mark making Red’s job of shutting them out harder. But if Blue tacks in the zone, Blue’s options to head Red up are limited, making it easier for Red to shut them out.
Occasionally, I use the shutout in the open course, not just on a starboard layline. Suppose I want to lead Red back, but I don’t want to tack just yet because of traffic or something like that, I can then hold them off from tacking for a bit. Wherever used, I love this move because Blue uses the rules to successfully reverse the control dynamic and put themselves in the drivers seat. It’s a cool move to have in your tactical toolbox.