I remember Kevin Burnham (two-time 470 Olympic medalist) telling me that you want the mast to be smoothly curved, like a bird’s wing, where there are nice transitions between one part and the next. It’s the same with a sail, and a great way to see the transition is with draft stripes. When you look at the three draft stripes on your mainsail, you want them to have a similar shape as they start at the mast and smoothly transition into the body of the sail. There is typically a small variation in each stripe from top to bottom—getting flatter or fuller as you go—and that’s normal, but you don’t want any one stripe sticking out as an anomaly. Depending on the boat you’re sailing, and the conditions in which you’re sailing, the stripes may get fuller or flatter as you transition toward the head of the sail.
For example, with an Etchells mainsail, in light air you might want power up high with a flatter section down low to open the slot between the back of the mainsail and the jib, which means you’ll see the bottom stripe fairly straight off the mast, the middle stripe a little deeper, and the top stripe deeper yet.
In big breeze and waves, it’s faster to have your main fuller down low to power through the waves, and flatter up high so you don’t tip over, so when you look at the stripes, the bottom stripe will be a little rounder as it comes off the mast, the middle one a little flatter, and the top one the flattest of the three. When you look at each stripe in order, there should be a linear pattern that reflects the sail getting progressively fuller or flatter depending on conditions.
Another consideration as you look at each stripe is the overall depth of the sail. As the stripe exits the mast and continues to the belly of the sail, you want smooth transitions. You also want the sail’s depth to transition smoothly from top to bottom, just like the stripes exiting the mast. It’s a good thing if you cannot see any abrupt transitions anywhere on the sail. Looking for these attributes shows how well mast bend matches the luff curve of the main and how well the sail is designed. If one area of the sail sticks out as too full or too flat, or not matching the rest of the sail, something’s not right.
When you have a classic example of a mainsail that has too much depth 3/4 of the way up the mast in the front of the sail, you can see it backwind in that section through the wind range. That’s an instant clue the area has too much luff curve built into the sail and/or the mast is very straight in that section.
RELATED: Mainsail Setup for Performance
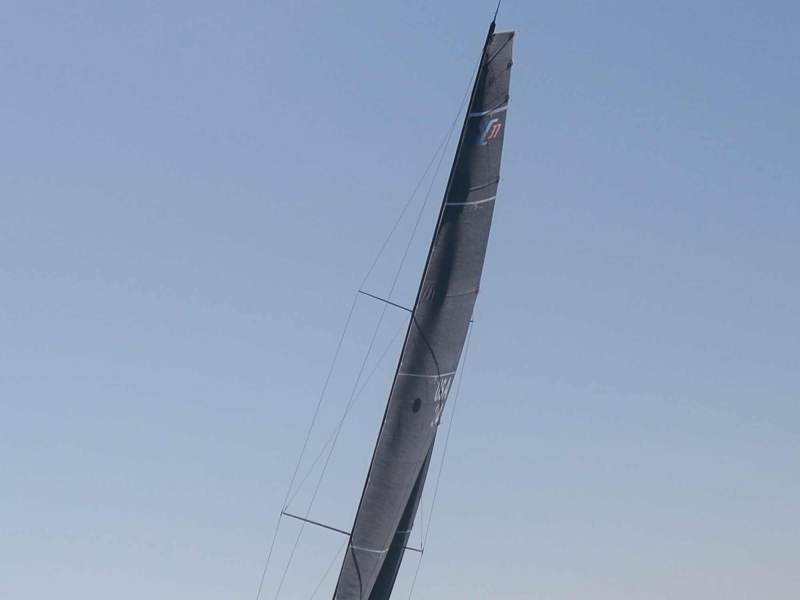
As an example, take a look at the photo of the IC37 mainsail. After sighting the mast from the side and seeing it has a smooth curve, and sailing with the sail throughout the range to confirm the problem always existed, our coach Dave Ullman took some luff curve out that area and the main looked and performed much better. If you see an anomaly, like this either the mast curvature—fore and aft—needs adjustment to better match the sail, or the luff curve needs a re-cut. The trick is to look at the fore-and-aft bend of the mast (side view) first to see if any section stands out as straighter, particularly where the problem is. And if it looks smooth, you should take the sail through the whole range of wind and see if the problem always exists. If so, it’s a sail issue. If you only see it occasionally, you may be able to fix the issue with rig tune. If rig tune changes don’t make a difference, get a sailmaker on board to judge exactly how many millimeters of luff curve need to be taken away.

Overbend Wrinkles
An easy sign that something’s wrong is when you start seeing overbend wrinkles. Overbend wrinkles are diagonal creases in the sail that run from the mast down toward (and sometimes all the way) to the clew. If they’re significant, they can even cause the batten in that area to hinge, falling off to leeward, which will destroy the boat’s ability to point. Overbend wrinkles mean your main is stressed out and stretched beyond its designed shape—the luff curve is breaking down because there’s more mast bend than the sail was designed to handle. The cool thing is that over-bend wrinkles often specifically point to the area of the mast creating the issue, (overly bent section of the mast), or they clearly designate the overly flat section of the sail (potential sail shape issue if the mast is straight).
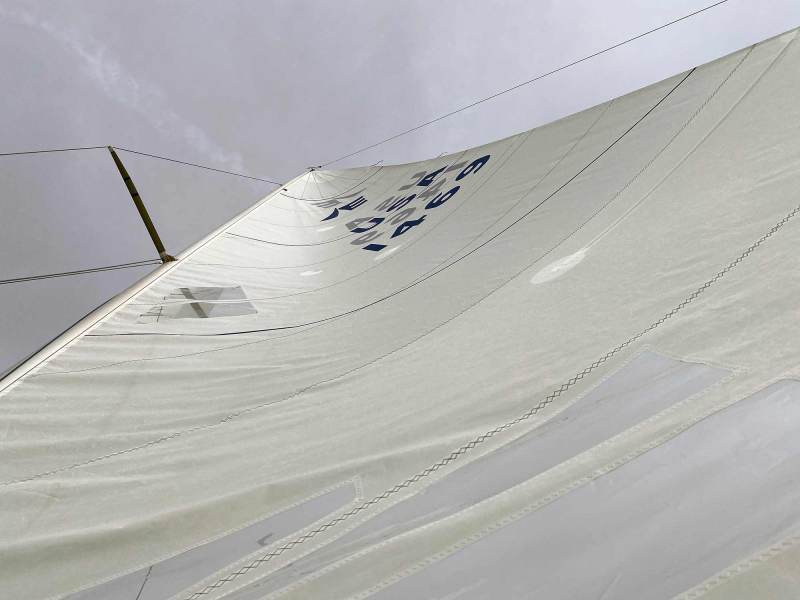
Don’t confuse over-bend wrinkles with the simple contraction of material around the bolt rope. Contraction wrinkles usually happen down low and tend to run parallel to the boom. Apart from the visual cues from the angle of the wrinkles—diagonal or horizontal —to tell whether you’re dealing with over-bend wrinkles or just contraction of the material, tighten the cunningham. If the wrinkles go away, you’re not dealing with over-bend wrinkles. But, if you tighten the cunningham and only the first 10-percent of wrinkles near the mast disappear and become smooth, that’s a sign of true over-bend wrinkles—either the mast is too bent or the sail does not have enough luff curve in that area.

The photo of USA 26 is a great example of pulling on the cunningham and only getting wrinkles in the first 10 percent of the sail to go smooth, indicating wrinkles are in fact over-bend. Most sailors don’t worry about the cosmetics of contraction wrinkles. If the wrinkles down low are pretty much in line with the wind, it’s not a big deal.
Although it takes time, before making any significant changes, it’s really important to use the sail in everything from light air to heavy air. If the same area of the sail always has an issue, the problem is probably with the sail. If you cannot see any specific anomalies or hard transitions in your sail shape, and the draft stripes change slightly in a linear pattern from top to bottom you are all set to go fast. Now just get the sail depth and twist right for the conditions and you are off like a rocket!