Hotfoot Rehab
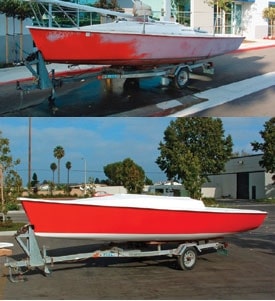
The United States is littered with abandoned, faded, peeling boats that are simply screaming for attention. They’re not the latest technological marvels, but they offer something better, the chance to own your own boat and to create recreation out of rubbish. Thus it doesn’t necessarily require much financial commitment to become a boat owner, merely a commitment to patience, hard work, and the gleaning of advice and guidance from your local experts. I know; I’ve experienced it first hand. Hotfoot 20, hull No. 19, built in 1986, was sitting forlornly in a Southern California storage facility in early 2004. The paint was peeling from the spars, and the fiberglass hull and decks were faded and dirty. Yet this Doug Hemphill-designed rocket-a lightweight design that later would be modified slightly and become the Ultimate 20-offered stability for family day sailing and speed and excitement for local PHRF racing. Could it be salvaged and returned to racing condition on a budget governed by southern California house prices and college funds? Only, I decided, if I did all the work myself without the luxury of boat hoists, sandblasters, and paint shops. After much negotiation, the owner was persuaded to sell the complete boat and galvanized trailer, and I dragged it to a friend’s warehouse for closer inspection. It certainly appeared that its bedraggled condition was merely cosmetic and that all hull and deck joints and stress points seemed as strong as they were the day the boat was built. Once I’d removed all the deck hardware I figured that there were five fundamental jobs that required attention: 1) Remove the antifouling, as I planned on storing the boat on the trailer; 2) refinish the hull, which was faded from red to dull pink; 3) refinish the decks, which were buried under many years of dust and debris; 4. repaint the spars which were peeling after 18 years of exposure to the California sunshine; and 5) replace the wilted sails. Below the waterline I started with the messiest job, the antifouling. Due to the very nature of the Hotfoot design, working on the bottom of the hull required lying on the ground, as the fully retractable keel meant that the boat sat low on the trailer. Armed with a scraper, a gallon can of fiberglass paint stripper (Interstrip 299E) to prevent damage to the underlying gelcoat, and coveralls, goggles and breathing mask to protect my skin and clothes from drips, I brushed on the stripper, left it for five minutes, and simply scraped off the loosened coating. What I hadn’t expected was the epoxy barrier coating under the antifouling. This I long-boarded using 600-grit sandpaper in order to fair and rough up the surface in preparation for a fresh coat of paint. The keel proved more of a challenge, as stripping it where it passed through the hull would cause a horrendous mess. I carefully located the fulcrum point of the hull, and having removed the two through-bolts on the keel’s head-which prevent the keel from dropping completely through the keel box and plummeting to the ocean’s bottom-I used a fork lift (that just happened to share the warehouse with my boat) and lengths of Kevlar line to lift the boat high enough above the trailer to allow the keel to fall out of the hull. Once out and lying on a pallet, the same attention was given to the keel as had been given to the hull – a simple but messy 5 hours of stripping and fairing. Having prepared the area below the waterline, I turned my attention to the topsides. Initially I had hoped to buff the old gel into a burnished red finish. Sadly the sun damage was too extensive and to make the boat look as I wanted, I had no choice but to take a more involvedapproach, and paint rather than polish. Although the hull shape appeared surprisingly fair, I long-boarded the entire hull with 220-grit sandpaper both to smooth and to key it in preparation for the paint. This was undoubtedly the most physically demanding job, and took me the best part of three days. The result, however, was worth the effort. Painting the hull My next big challenge was the painting itself. I was tempted to use two-part epoxy paint for durability, but at the last moment chose a single-part yacht enamel, Interlux Toplac Enamel, for ease of application. My initial dream of spraying the whole boat was brought down to earth with the realization that without a proper boat hoist I couldn’t get the hull high enough for long enough both to spray the bottom and give the white enamel under the waterline time to dry. Instead, I chose to roll and tip the bottom from centerline to waterline on alternate sides while the hull was propped at an angle using 1′ by 6′ boards; no primer was needed as the underlying coat of epoxy was in good condition. The red above the waterline, however, was the epitome of ease. Using an air compressor and spray gun I sprayed two coats of single-part yacht enamel, Interlux Toplac Enamel, on each side of the hull, resulting in a lustrous, brilliant finish that contrasted elegantly with the bright white below. It was as quick andeffortless as it sounds-each coat took about 40 minutes to apply, and at a cost of only $80 the hull looked as good as new. When it came to spraying the keel I chose a slightly different paint. My concern was that every time I raised and lowered the keel it would rub against the keel box and the deck opening, stripping paint and causing drag. Although I again used a one-part paint, for this application I chose Interlux Brightside for superior abrasion resistance; had money been no object I would definitely have preferred to use a two-part epoxy for the keel. The spars provided more problems. My idea to have them sand-blasted and re-sprayed was put to rest for two reasons: a local yard quoted me $1,300 for the job, and the ever-helpful Mike Angus of YachtTech Spars in British Columbia-the supplier of the original spars-suggested that sand-blasting was too aggressive. He also suggested I use Awlgrip to recoat. However, due to financial constraints [According to the manufacturer, Awlgrip is best applied by professional painters.-Ed] I sanded the old paint off the spars using an orbital sander and 150-grit paper, applied a zinc chromate primer to the bare metal, and then sprayed Interlux Multithane Two-Part Primer and Interlux Interthane Plus Two-Part Enamel instead of the Awlgrip. I lightly sanded between each coat and the result, costing around $200 and about 10 hours of work, was a smooth and clean white mast, boom, and spinnaker pole. Addressing the deck and sails The application of a pressure washer over the decks, cabin and cockpit turned them from a brownish-gray to a matte white. Eighteen years of exposure to the California sun had stripped them of their gloss and, although now clean, they were porous to water and dirt; I had little choice but to paint them also. This final paint job was easy. The pressure washer with a detergent and water mix had removed all the grease and dirt and had left me with the molded non-skid perfectly prepared. It only took a 9-inch roller, two cans of Interlux Interdeck, a total of $60 and about one hour of labor to make them look, and act, as good as new. Finally, I turned my thoughts to the sails. There were a few excellent sailmakers who had already made PHRF sails for the Hotfoot 20 class, and although I was tempted to go with one of them I instead decided to go with a small New England loft-Vermont Sailing Partners (ex-Shore Sails VT) -whose work I had admired over the years. I sent the multitude of measurements that Bill Fastiggi, a top Lightning racer who also ran Vermont Sailing Partners’ loft, had requested, and he produced a beautiful suit of sails. The only problem was that I’d supplied him with the wrong luff measurement and so the main, built exactly to my specifications, was 10-inches too long for the mast. I returned the sail to Fastiggi and he rebuilt it to the correct measurements at no cost to me. Six months of part-time labor and $1,400 in paint, new running rigging, new standing rigging and selective new deck hardware, saw Hotfoot No. 119 Heffalump, in its new red livery and sporting its new Pentex racing sails (my only other investment), finally kiss the cool Pacific waters off Santa Barbara, Calif.

")


