Instruments can only be accurately calibrated if the primary sensors are installed correctly in sensible locations. So before you set out to calibrate your instruments, it’s worth taking the time to check your primary sensors and their physical surroundings, as this may help you avoid potential problems down the line. With that in mind, here are a few essential checks you should make before heading out.
The boatspeed sensor should be installed on centerline, with the molded arrow on the top of the sensor pointing forward. If the sensor is installed off centerline, or is misaligned, it will not be able to measure the same boatspeed from tack to tack. If it’s too far forward, the sensor may be prone to coming out of the water at higher speeds. If the sensor is fitted too far outboard, it could come out of the water when heeling.
Paddlewheel sensors are susceptible to marine growth; even ultrasonic sensors will suffer from the buildup of marine growth across the sensor face. So it’s important to check that the sensor is clean and the paddlewheel spins freely. It’s also good practice to remove the sensor from the hull and fit a blanking plug when the boat is not in use for extended periods.
The compass sensor should be installed as close to the center of rotation of the boat as possible because this helps negate the effects of excessive pitch and roll motion on the sensor. Installation at the center of rotation is often not possible, so if this is the case for your boat, install the sensor as close as you can. Avoid extreme positions at bow or stern, port or starboard.
It’s also important to mount the compass as far away as possible from objects that cause magnetic interference. These objects include iron keels, engines, generators, VHF speakers, etc. Thought must also be given to electrical cables on the boat such as power to the autopilot, which carry high DC current, as these can have a significant and dynamic effect on the compass. If your compass turns left when your autopilot turns right, you won’t be satisfied with its performance. You should also be careful where tool bags live, or other moveable large metal objects, as these can all have an effect on the magnetic compass reading.
The wind sensor is surrounded by other items at the top of the mast, such as burgees, VHF antennas, weather receivers, and cameras, so it will never be in clear air and therefore will never give you an accurate wind reading. Even the sails have a major effect on the masthead unit (called upwash, which we will explain later.)
The importance of getting these basic sensors calibrated correctly should never be underestimated. It’s common to hear people complain that their true-wind angles are different from tack to tack, but they give little thought to the reasons why or make the association with boatspeed being different from tack to tack.
There are five core sensors in an integrated sailing instrument system; these are depth, compass, boatspeed, apparent wind, and GPS. Baseline calibration of the first four is essential.
Depth is the single most important piece of information any sailor needs to know while sailing. It’s no good knowing that the layline is 2 minutes away, or that your target velocity made to course is 7.2 knots, if you are about to run aground. Having accurate depth is also a critical tactical tool when sailing in tidal waters, as it helps you stay in the most favorable current.
Modern depth sounders are very reliable and rarely give false readings, unless you are in a marina where most sounders work on the same frequency, as being in close proximity to other sounders can cause interference. They’re also not reliable when you pass through the wash of a large vessel because the turbulence from the large vessel’s propellers cause false returns in the water column, resulting in false depth readings or temporary loss of depth readings. The data can also be false if the depth sounder is installed too close to the keel bulb, as this leads to the sounding returns resulting from the keel bulb, rather than the seabed. It is always worth checking that the depth reading is changing as you move and that it corresponds to your paper chart.
The compass is used for more than just heading information; it’s also used in the calculation of true-wind direction, tide-set, and for dead reckoning. Compass calibration is essential; think of it as letting your compass learn about the environment in which it has to work. Always follow the manufacturer’s instructions, performing the compass swing in an open area, away from shallow water, busy shipping channels, and industrial docks packed with large metal containers. Before you swing the compass, make one last check that everything onboard is stowed and that no large metallic objects are going to be added to the boat after the swing. A tool bag left near the compass could make you think the compass has stopped working.
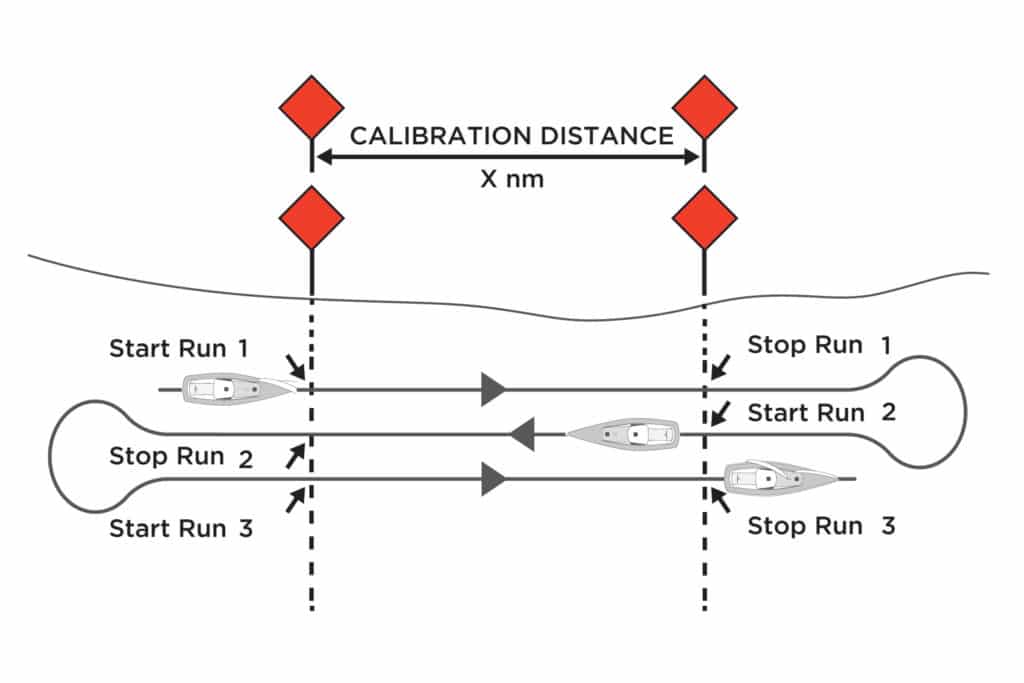
Boatspeed is key to accurate navigation and performance measurement. If your GPS fails, offshore navigation is taken back to a time of dead reckoning and celestial navigation, and any work on target speeds or polar tables is pointless if the boatspeed reading is inaccurate. Boatspeed calibration is relatively straightforward and is easiest in non-tidal flat water, where a direct comparison between speed over ground and boatspeed can easily be made.
In tidal areas, boatspeed calibration can be more difficult, and the following important rules should always be followed: 1. Use a known distance, i.e., a measured mile, or two known GPS waypoints. Buoys should not be used as they move on the tide. 2. Steer a constant compass heading, not course over ground. 3. If there’s a cross-tide, do not correct for it, let it push you sideways off your line and end the run when the waypoint is abeam. Ideally use a run where the tide is straight up and down, or slack. 4. Use constant engine revolutions and a constant boatspeed, and do three runs for better averaging of the tidal effects on the boat.
So long as you observe these four rules and follow the instrument manufacturer’s guidelines, you will end up with a good base calibration for boatspeed. Write it down for future reference.
The apparent wind is what we measure at the top of the masthead with no calibration applied, other than an offset value. Some instrument manufacturers call this raw measurement “measured wind.” The instrument manufacturer, who has access to wind tunnel data, usually calibrates apparent-wind speed. Approximately 99 percent of inaccuracies in apparent-wind speed can be attributed to effects such as wind gradient rather than problems with basic calibration, so the manufacturer’s calibration should not be altered.
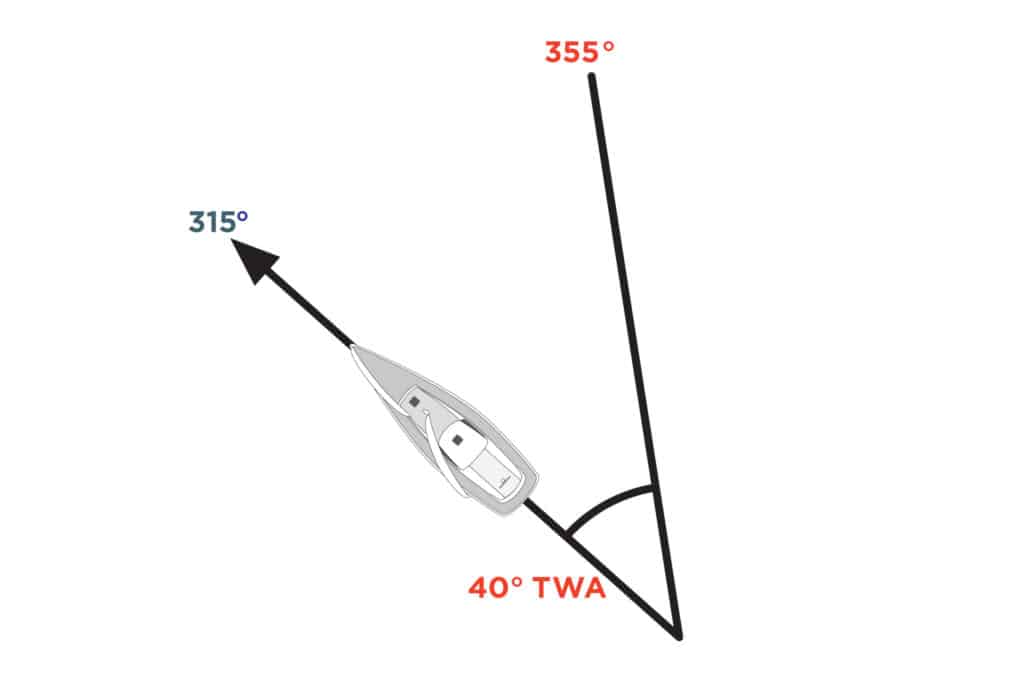
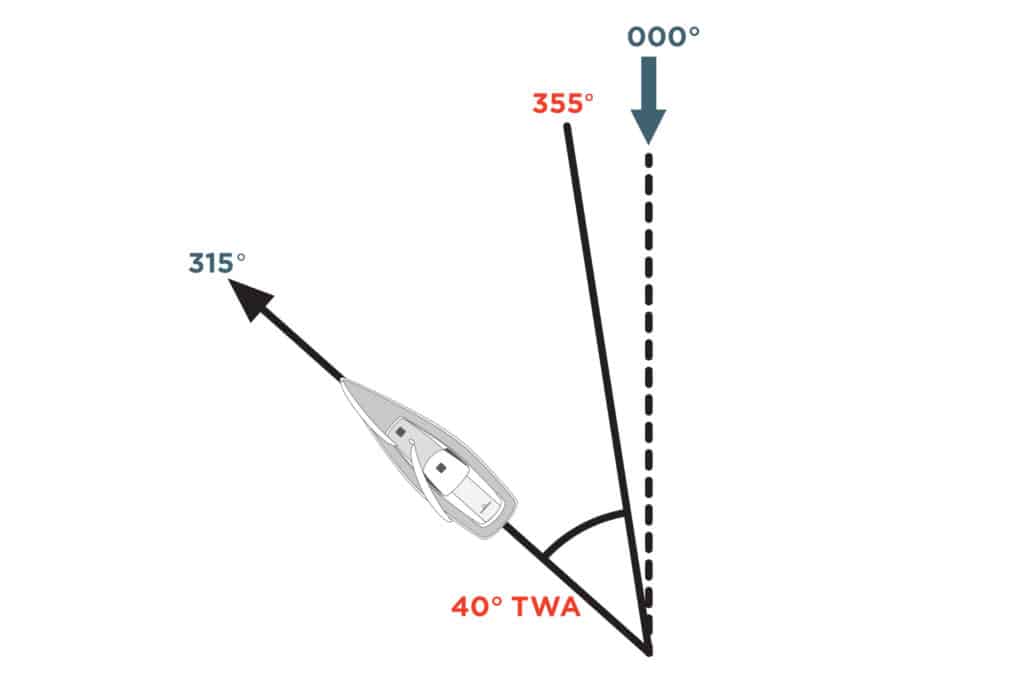
Apparent-wind angle calibration is much more important, as this accounts for any misalignment of the wind sensor during installation. There are two ways of measuring any alignment error. The first is to go head-to-wind and read the apparent-wind angle value. It should read zero degrees. Any deviation from this is due to misalignment of the masthead unit. However, this method is not very accurate, because it relies on holding the boat head to wind and the wind not shifting. The more accurate method is to tack upwind in stable conditions (no building sea breeze, reasonably flat water) and with a correctly calibrated boatspeed.
Using identical sail trim from tack to tack, disregarding the instruments (except for boatspeed), and using the same crew weight distribution, the helmsman should aim to achieve a constant boatspeed tack to tack, and the navigator should then note the apparent-wind angle on each tack. Any difference is the misalignment of the masthead unit and can be corrected in the instrument system.
Once a good apparent-wind angle is established, it should not be changed unless the rig is removed, a new wind sensor is installed, or the rigging is re-tuned. Which brings one final tip: Do not calibrate the instruments on the same day you’re tuning the rig, as any incorrect bend or twist in the mast will have an effect on the direction the wind sensor points.
Your basic calibrations are now complete, and you’re on your way to having reliable numbers, but you cannot relax just yet. Boatspeed and true wind require a little more attention, and in the case of true wind, it can be a daily task.
Many instrument systems don’t have such advanced features—if that’s the case for your system then ensure you’ve done the basics well and use the following to understand when your instruments might not be telling you the whole truth.
Advanced boatspeed calibration: The calibration value you have is for an upright boat, motoring along a measured mile at around 6 to 8 knots. It’s a good starting point, but as soon as the boat heels and the speed increases, it becomes less valid. There are three main factors at play here: First, if your speed sensor is not installed on the centerline of the boat, it will always read differently tack-to-tack. This is due to a difference in water flow angle over the sensor tack-to-tack and applies to both paddlewheels and ultrasonic sensors.
Secondly, as the heel angle increases, the boatspeed reading usually increases. Again, this is due to the change in water flow over the hull surface and applies to all sensors.
Finally, the physical characteristics of the speed sensor can cause calibration issues. Paddlewheel sensors are inherently non-linear due to the fact they measure water flow so close to the boat. At higher boatspeeds the paddlewheel tends to over-read, relative to the initial calibration, due to its mechanical nature and changes in the hull-boundary layer.
Some of the higher-end instrument systems have tables that allow you to apply corrections for the non-linear nature of the sensor and the effects of heeling on boatspeed. They also have a tack offset function, which allows the user with an off-centerline sensor to establish the tack that reads correctly and apply a correction to the other tack.
As with basic boatspeed calibration, the ideal conditions for advanced calibration of boatspeed are flat, non-tidal waters, which allow for an easy comparison between boatspeed and speed over ground. However, this is not always the case, and only time and experience will allow you to understand the tidal component and when you can and cannot compare boatspeed to your speed over the ground. Finding the ideal conditions is often tricky, but perseverance will pay off.
Advanced true-wind calibration: The holy grail of any instrument system is to be able to provide an accurate true-wind direction—reliably spotting a small shift can be worth significant mileage. Now that your four core sensors are well calibrated, your instrument system should work perfectly, with two exceptions:
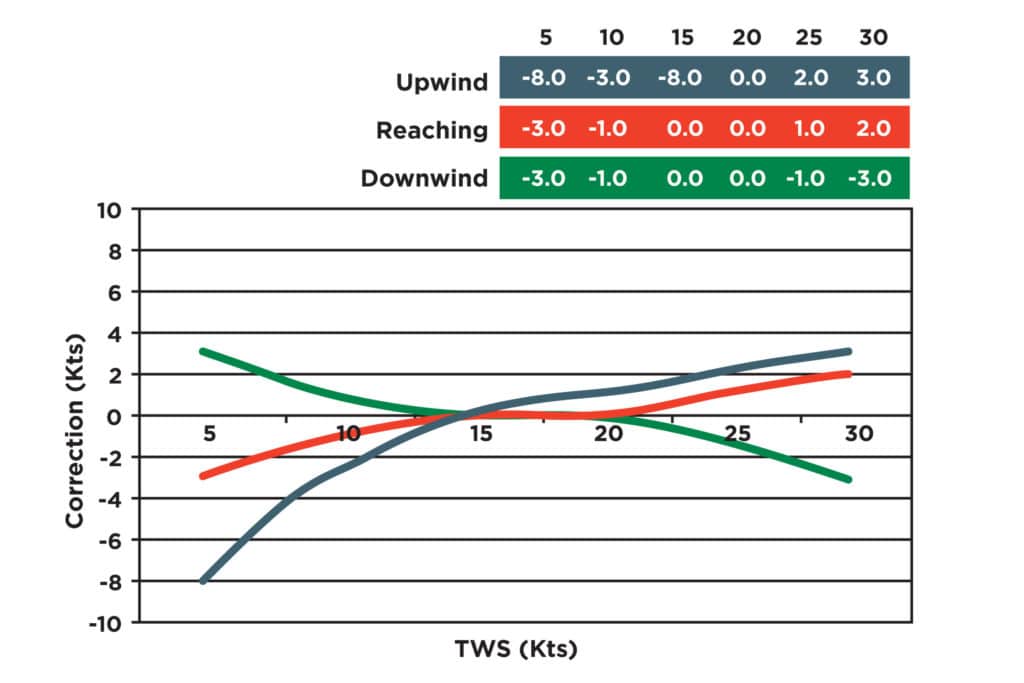
The true-wind speed will over-read when sailing downwind, and the true-wind direction and angle will read differently from tack to tack. The increase in true-wind speed is simple to deal with; the cause is the wind accelerating over the masthead unit due to the influence of the sails when sailing downwind. The good news is that the effect is constant, and by applying a correction of between 12 and negative 15 percent to the true-wind speed downwind, you will solve the problem.
The difference in true-wind direction or true-wind angle from tack to tack is not so straightforward to explain. There are a combination of factors at play including mast twist, deflection of the wind by the sail plan, air temperature, humidity, and barometric pressure. We usually refer to the combination of these factors as upwash, and it is most visible in the true-wind direction.
High-end instrument systems have a true-wind correction table available to make corrections. Unfortunately, the corrections are not constant; they differ according to windspeed and point of sail, so a significant amount of effort must be put into creating a table for corrections across the windspeed range, and for upwind, reaching, and downwind.
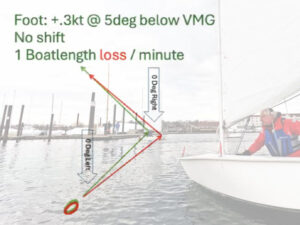
The basic rule for true-wind correction is as follows: If the true-wind direction is lifting tack-to-tack (when you exit a tack, the true-wind direction indicates you’ve been lifted), then the true-wind angle is reading too wide and half the error should be subtracted. If the true-wind direction is heading tack-to-tack (the true-wind direction indicates you have been headed on the new tack), then the true-wind angle is reading too narrow and half the error should be added.
Calibration and refinement of the true-wind direction is a continuous process. Differences in the true-wind direction can change from morning to afternoon as sea breezes build and the wind gradient changes. If all else fails, once again, you can always blame wind shear.
Miles Seddon, of the United Kingdom, worked for B&G from 2005 to 2013 before establishing himself as a consultant. While at B&G, he worked with Volvo Ocean Race (developing the electronic package for the VO65), Vendee Globe, and America’s Cup teams. He currently works with Team SCA in the Volvo Ocean Race, managing their performance analysis and instrumentation coaching.
This article first appeared in the March/April 2014 issue of Sailing World. Click here for more strategy tips.
Boatspeed Calibration
True-Wind Calibration Basics 01
True-Wind Calibration Basics 02
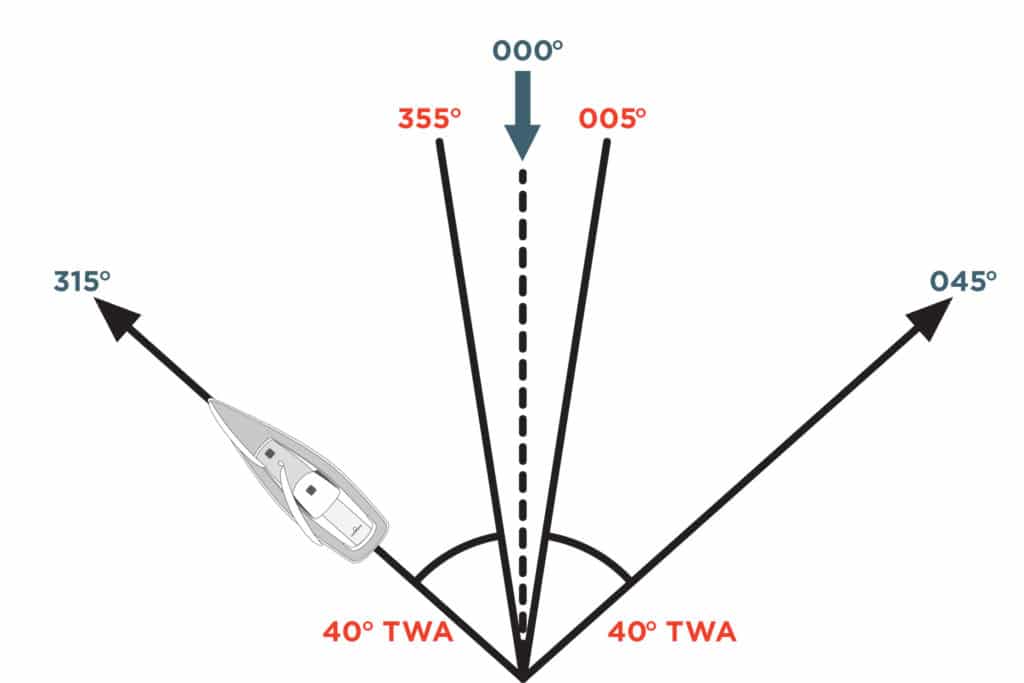
True-Wind Calibration Basics 03