When multi-class champion Bruce Goldsmith gave me the chance to work at his side for a year I was most excited about understanding the various sail controls. I quickly learned (and wrote in previous articles) the tactical aspects of racing were the most important. Still, before being around Bruce, I had only really raced a Sunfish, which basically relied on steering and mainsheet adjustments to make the boat go.
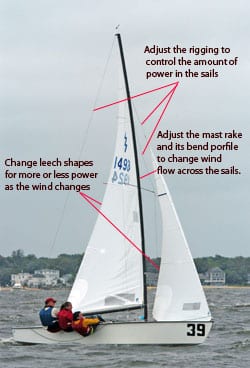
Bruce let me crew for him in his favorite class, the Lightning. It has all the sail controls needed to make significant sail adjustments including jib sag control, jib cunningham, adjustable leads, vang, backstay, mast pre-bend, outhaul, main cunningham, boom angle adjustment, and more.
If that sounds like a lot of lines to pull, you’re right, and I too was overwhelmed at first. But Bruce took the time to explain how all the adjustments affect sail shape and explained that the adjustments made for the Lightning would be made in the same manner for all other types of boats I would sail in the future. He was right, I have won championships in multiple classes and I maintain Bruce’s tuning ideas regardless of the class.
I’ve since boiled down what I think are the main ingredients to understanding the most essential adjustments. I’m sure Bruce would agree, so before we proceed, take a few minutes to look over my 20-point cheat sheet at the bottom of the page. You can add more to your own, but for me, 20 is more than enough.
Learning how Bruce treated these adjustments as simple guides was more of a relief than anything else. I assumed he would be making never ending micro adjustments tuning the Lightning like it was a musical instrument. What I found was that these adjustments were not used too often. They were secondary when related to sheet adjustments and steering.
Bruce’s concentration was unbelievable, and he was rarely out of the groove. He spent most of the time steering and adjusting main and jib sheet to stay on course with the velocity and directional changes. He knew that the helmsman must spend most of his time trying to keep the boat’s direction at the optimum angle.
He also demonstrated to me that steering the boat through a wind shift is easy to understand in the big scheme of things, but steering through velocity changes may not be so easy to understand. He would remind me that velocity changes affect the apparent-wind direction. Apparent-wind direction is derived from the true-wind direction, the boat’s speed and boat’s direction.
Sound confusing? If it does, consider my favorite example of how it all works: Get on your bicycle for an easy demonstration. With a flag on a stick taped to your handlebars, let the wind blow from a right angle to the bike. As you move forward, the apparent-wind direction moves forward. The faster the bike goes the more forward the apparent-wind direction goes.
If the bike is at constant speed and the wind gets stronger, then the apparent wind goes aft. If the bike is at constant speed and the wind speed drops, the apparent wind goes forward. If the wind speed is constant and the bike slows down the apparent wind goes aft. Now replace the bike with a boat and you can imagine why your steering and sheeting duties never rest!
The sheet adjustments are nearly as critical as steering. As the wind goes aft, ease the sheet a little bit initially. If the boat is at maximum speed, the apparent wind goes forward, so make a small sheet trim until the boat speed drops. Just remember, the wind is always changing, and so, too, should your sail controls.
Bill’s 20 Point Sail-Trim Cheat Sheet
1. Sail with a loose headstay in light to moderate air to power up the jib and “decrease” the sheeting angle. Do this by loosening the shrouds and backstay.
2. Sail with a tight headstay in breeze to de-power or flatten the jib and “increase”
the sheeting angle. Do this by tightening the shrouds and backstay.
3. Rake the mast forward in light air to increase the chord length on the sails and
close up the slot between the jib and main.
4. Rake the mast aft in breeze to decrease the chord length on the sails and open up the slot between the jib and main.
5. In light air, induce mast bend with the standing rigging to flatten the front of the main.
6. In breeze, prevent mast bend with the standing rigging as mainsheet tension and backstay will bend the mast enough.
7. When sailing upwind, trim the middle of the jib leech parallel with the centerline
of the boat in moderate air. Twist the leech open in light or heavy air.
8. When sailing upwind, trim the top batten of the main parallel with the boom in
moderate air, twist the leach open in light or heavy air.
9. When sailing downwind, trim the top batten of the main parallel with the boom by adjusting the vang.
10. Put your jib car in a position where the bottom of the jib is slightly flatter than the middle of the jib.
11. In light to moderate air, have wrinkles or scallops in the jib luff and wrinkles in the main luff.
12. In breeze, take out the scallops and wrinkles with the jib halyard and main cunningham.
13. On a sloop-rigged boat, start with the boom on the centerline in light to moderate
air, then put the traveler down in a breeze.
14. On a cat-rigged boat, start with the boom off the centerline in light to moderate air and put the traveler further down in a breeze.
15. Upwind, sail with the outhaul tight in light air or heavy air, loose in moderate.
16. Use only enough backstay to keep the boat from getting overpowered. Some depth in the main is needed to get through waves.
17. In light to moderate air, use no vang upwind. In breeze, use increasing amounts of vang.
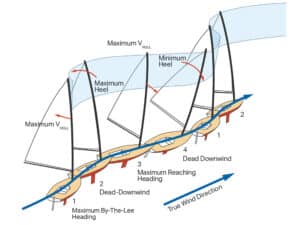
18. Upwind, sail with a slight leeward heel in light air; flat or with a slight windward heel in moderate air; and a slight leeward heel in a breeze.
19. Sail the boat heeled to windward downwind.
20. When running downwind, sail with the spinnaker pole as far down and aft as possible to make the spinnaker seem bigger.
This article first appeared as “From the Experts” in our October 2008 issue.